Social Icons

Saturday, November 9, 2013

What is svchost.exe And Why Is It Running?

You are no doubt reading this article because you are wondering why on earth there are nearly a dozen processes running with the name svchost.exe. You can't kill them, and you don't remember starting them… so what are they?
So What Is It?
According to Microsoft: "svchost.exe is a generic host process name for services that run from dynamic-link libraries". Could we have that in english please?
Some time ago, Microsoft started moving all of the functionality from internal Windows services into .dll files instead of .exe files. From a programming perspective this makes more sense for reusability… but the problem is that you can't launch a .dll file directly from Windows, it has to be loaded up from a running executable (.exe). Thus the svchost.exe process was born.
Why Are There So Many svchost.exes Running?
If you've ever taken a look at the Services section in control panel you might notice that there are a Lot of services required by Windows. If every single service ran under a single svchost.exe instance, a failure in one might bring down all of Windows… so they are separated out.
Those services are organized into logical groups, and then a single svchost.exe instance is created for each group. For instance, one svchost.exe instance runs the 3 services related to the firewall. Another svchost.exe instance might run all the services related to the user interface, and so on.
So What Can I Do About It?
You can trim down unneeded services by disabling or stopping the services that don't absolutely need to be running. Additionally, if you are noticing very heavy CPU usage on a single svchost.exe instance you can restart the services running under that instance.
The biggest problem is identifying what services are being run on a particular svchost.exe instance… we'll cover that below.
If you are curious what we're talking about, just open up Task Manager and check the "Show processes from all users" box:
image
Checking From the Command Line (Vista or XP Pro)
If you want to see what services are being hosted by a particular svchost.exe instance, you can use the tasklist command from the command prompt in order to see the list of services.
tasklist /SVC
image
The problem with using the command line method is that you don't necessarily know what these cryptic names refer to.
Checking in Task Manager in Vista
You can right-click on a particular svchost.exe process, and then choose the "Go to Service" option.
image
This will flip over to the Services tab, where the services running under that svchost.exe process will be selected:
image
The great thing about doing it this way is that you can see the real name under the Description column, so you can choose to disable the service if you don't want it running.
Using Process Explorer in Vista or XP
You can use the excellent Process Explorer utility from Microsoft/Sysinternals to see what services are running as a part of a svchost.exe process.
Hovering your mouse over one of the processes will show you a popup list of all the services:
image
Or you can double-click on a svchost.exe instance and select the Services tab, where you can choose to stop one of the services if you choose.
image
Disabling Services
Open up Services from the administrative tools section of Control Panel, or typeservices.msc into the start menu search or run box.
Find the service in the list that you'd like to disable, and either double-click on it or right-click and choose Properties.
image
Change the Startup Type to Disabled, and then click the Stop button to immediately stop it.
image
You could also use the command prompt to disable the service if you choose. In this command "trkwks" is the Service name from the above dialog, but if you go back to the tasklist command at the beginning of this article you'll notice you can find it there as well.
sc config trkwks start= disabled
Hopefully this helps somebody!
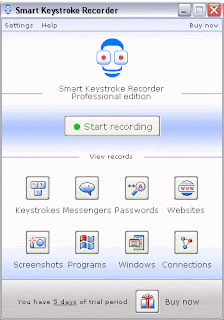
Record Keystrokes of your PC

Have you ever got the feeling to take your home PC security and privacy to yet further more level? If your PC is used by other family members and/or friends and you want to monitor every log, every keystroke, every click with visual screenshots, complete online history, two way chats and anything happening at your PC used by any user, then here is a secret solution for you.
Superior stealth, secret, invisible keylogger is a very powerful PC and Internet monitoring software, it secretly records absolutely every keystroke entered on your computer, retaining all key information even in the event of an abnormal shutdown. It also records chats from all popular clients. The PRO version incorporates visual surveillance techniques that allow you to set the quality and time period of the screenshots it takes like a surveillance camera. Easy to use and compact - Easy to use and install, it is designed for all levels of users. Low on system requirements, it does not slow your computer down. Monitors Internet activity - An invisible keylogger, it secretly watches Internet activity and logs every web-site visited. You can monitor other PC users activity and act timely if needed to save yourself or others whats not right, using this software.
Features:
  • Captures AOL/AIM/Yahoo/ICQ/MSN chats. Records two-way chats. Supports also the latest messengers version: (ICQ, MSN live, Yahoo!, AOL/ AIM)
  • Completely hidden from users; it is invisible in windows NT/2000/XP Task manager and Windows 95/98/ME Task list. It cannot be viewed in registry startup list either, making it a highly effective monitoring solution for your surveillance needs.
  • Captures all passwords - An advanced stealth keylogger, it secretly captures and logs all passwords, even those behind asterisks, so you can immediately identify who logged into your accounts.
  • Online chats - Captures all on-line chats on AOL, AIM, MSN, Yahoo and ICQ in the two-way mode, allowing you to take timely action to protect your family and business interests.
  • Supports all Keyboards - Unlike other keyloggers, this USB Keystroke Recorder supports all international keyboards including a USB keyboard, precluding the need for a separate adapter set for USB operation.
  • Enables log viewing by simple press of the button.
  • Auto-run at startup - no need for a manual launch.
  • Monitors all users of the PC - even if you don't know their passwords.
  • User friendly log - It records all applications run and text typed, logging the password, time, date, window caption and the launched program options in an easy to understand format.
  • The PRO version will also send the log to you by e-mail, no matter where you are, allowing you to easily find, open, save or delete data. The user-friendly log is accessible only to you via a unique username and password that only you can change
  • Visual surveillance - (PRO version) All you have to do is to click to enable visual surveillance and customize the degree of picture quality and the time period that should elapse between screen shots.
  • Monitors opened applications and windows - (PRO version) Information for the user, date and time.
  • Password protected - (PRO version) In the settings dialog you can enter your password, so the program can be started only with this password.
  • UDP/TCP connections logging.
Download Smart Keystroke recorder Pro


Download

Please share your views on Comments Section.

Useful Websites 2

Links

http://katz.cd/
http://www.phazeddl.com/

Downloads

http://www.download.com/
http://www.softpedia.com/
http://www.soft32.com/
http://www.soft82.com/
http://3d2f.com/
http://www.filehippo.com/

Forums (Softwares)

http://crackedsoftwares.com/
http://www.warezteam.com/
http://www.freesoft.in/
http://www.final4ever.com/
http://www.exbii.com/
http://www.downforum.com/
http://warezraid.com/
http://waz-warez.org/
http://bayw.org/
http://crostuff.net/
http://warezboard.net/
http://www.zeedownload.org/
http://balkanw.org/
http://www.warezskill.org/
http://warezraid.com/
http://www.pirateflames.com/
http://platinumw.org/
http://thephoenix-forums.com/
http://war3zunlimit3d.com/
http://xsaimex.net/
http://swtim.org/
http://thedownloadforum.com/
http://neosharez.com/
http://watchingducks.info/
http://nd-warez.info/
http://latestwarez.com/
http://alb-share.com/
http://realdl.com/
http://dreamforums.org/
http://warez-central.net/
http://linkzshare.net/
http://da-legends.info/
http://dirtydingo.org/
http://theseekersoasis.org/
http://zipile.com/
http://hackerz-bb.info/
http://rapidsharegarden.com/
http://warezwebmasters.co.uk/
http://symbiansector.net/
http://elitepirate.com/
http://joeschatterbox.co.uk/
http://gurudl.com/
http://kj9s.com/
http://apps.katz.cd/site/warezscene.org
http://legendaryhackerz.com/
http://hitzwarez.com/
http://wareztalkz.com/
http://phrozenfilez.com/
http://warez-bay.com/
http://theseekersoasis.org/
http://lineapps.com/
http://codehacks.org/
http://triniwarez.com/
http://hitzwarez.com/
http://bookviet4a.org/
http://ctforumgroup.com/
http://forumcraze.com/
http://owlsnest.info/
http://5starsbazaar.net/
http://xtremew.org/
http://owlsnest.info/
http://badboys-aftermath.com/
http://tachoz.net/
http://phrozenfilez.com/
http://warezusa.org/
http://mybluemoon-planet.com/
http:/vs-zone.org
http://fast-blog.org/
http://warez.4biz.com.ua/
http://apnigang.com/
http://rapidw.org/
http://quickmovies.org/
http://balkanw.org/
http://da-legends.info/
http://site/pengushare.com
http://site/swtim.org
http://site/novawarez.org
http://xsaimex.net/
http://flaminbox.com/
http://warezdominator.com/

Movies

http://neverlegit.org/
http://crostuff.net/
http://onlineflixz.com/
http://bootforfun.com/
http://watchingducks.info/
http://bestleech.com/
http://forum.poizonx.com/
http://aiostop.com/
http://megashareslink.com/
http://w4rez.org/
http://flaminbox.com/
http://neverlegit.org/
http://flaminbox.com/

-- 

Microsoft Products Error Messages & Solutions

Its common to encounter error messages while using Microsoft products for any IT professional. Error messages arise due to the virus attacks, system malfunction, malware or adware attacks, files overwrite problem and through many other resources. Well good news is this, you do not have to go and search for every error message that you encounter with Windows, Microsoft Office or any other product. It is now all at the single place.
Microsoft has organized their help and support system. Microsoft has introduced an online automated troubleshooting system. It is very good approach of Microsoft to organize and provide the solution to every error message of Microsoft products at single place. To use this automated help and support system, just go to the below mentioned Microsoft URL and type in the error message or error code which you are encountering. The results will start appearing below immediately. Select required result and it will tell you the exact solution for your problem.


--

Speed up Adobe Acrobat 6 startup

PC Magazine had a very similar article, however I found this on www.x1000forums.com by looking at Google's cache of the page.

(Easily reversible if you change your mind).

1) Start Adobe Reader. To turn off the splash screen go to Edit - Preferences - Startup then uncheck the box "Display Splash Screen". I also turn off "Show messages and automatically update".

2) Shutdown Adobe Reader. Go to C:\Program Files\Adobe\Acrobat 6.0\Reader (replace the C: if you installed on another drive).

3) Create a new folder called plug_ins_disabled or plug_ins_backup, your choice.

4) Move all the files and the folders (except three files see #5) from the plug_ins folder to the disabled or backup folder you just created.

5) Leave the following three files in the original folder, EWH32.api, search.api and search5.api, if you have them. [If you use adobe to print across the internet, leave in printme.api] [If you want the weblinks to work, leave in escript.ini and weblink.ini]
Now start Adobe Reader and enjoy the speed increase.

(Once again, If you change your mind, simply move all the files back.)


Link to the article on Pc Mag's website: Speed Loading of PDF files

PC Mag's article says to leave EWH32.api, printme.api, and search.api in the original folder.

Linux Commands

Most Used Commands for Linux (Servers)

ls
cd
cp (copies files)
mv (rename or move files)
rm (removes--deletes files)
chmod (changes permissions)

Explanation of essential and most used Linux commands


Explanation of Linux (Unix) Commands

ls -l this will list a directory and details about all the listed files

cd .. will go up a directory

cd \ will change to the highest level directory (root directory)

Rename the Recycle Bin

If you (like me) would like to be able to rename the Recycle Bin to something else (Trash, Waste, Shredder, etc) then this tweak will make it easy to do so.

Open up your favorite plain text editor (notepad, for example) and copy the following text into a new file:

Windows Registry Editor Version 5.00

[HKEY_CLASSES_ROOT\CLSID\{645FF040-5081-101B-9F08-00AA002F954E}\ShellFolder]
"Attributes"=hex:50,01,00,20
"CallForAttributes"=dword:00000000


Now save this text file as a .reg file, such as "Rename Recycle Bin.reg" and put it wherever you like. Double click on the file, and when it asks you if you want to import it into the registry, choose Yes. You'll notice a new option in the right-click menu to Rename the Recycle Bin. You can also rename it by highlighing the Bin and hitting F2, or by highlighting it and clicking on the file name (just like renaming any other file.

If you want to turn off this new feature, make another .reg file with the same content as above, but change the first number in the "Attributes"=hex: line from 50 to 40 and import that file into the registry.

Display a message on Startup

If you would like to display a legal message or any other message in a pop-up window when windows starts read below:
  1. Start regedit, if you are unfamiliar with regedit please see ourFAQ.
  2. Navigate toHKEY_LOCAL_MACHINE\SOFTWARE\Microsoft\Windows NT\CurrentVersion\Winlogon
  3. Modify the key legalnoticecaption with what you want to name the window.
  4. Modify the key legalnoticetext with what you want the window to say.
  5. Restart.

Rename the Recycle Bin

If you (like me) would like to be able to rename the Recycle Bin to something else (Trash, Waste, Shredder, etc) then this tweak will make it easy to do so.

Open up your favorite plain text editor (notepad, for example) and copy the following text into a new file:

Windows Registry Editor Version 5.00

[HKEY_CLASSES_ROOT\CLSID\{645FF040-5081-101B-9F08-00AA002F954E}\ShellFolder]
"Attributes"=hex:50,01,00,20
"CallForAttributes"=dword:00000000


Now save this text file as a .reg file, such as "Rename Recycle Bin.reg" and put it wherever you like. Double click on the file, and when it asks you if you want to import it into the registry, choose Yes. You'll notice a new option in the right-click menu to Rename the Recycle Bin. You can also rename it by highlighing the Bin and hitting F2, or by highlighting it and clicking on the file name (just like renaming any other file.

If you want to turn off this new feature, make another .reg file with the same content as above, but change the first number in the "Attributes"=hex: line from 50 to 40 and import that file into the registry.

Photoshop CS & CS2 Features

Photoshop CS
Top Features for Photographers:
  • Professional toolset: create original images or modify photos using a full assortment of painting, drawing, and retouching tools.
  • Color correction: improve the color, contrast, and dynamic range of any image with a comprehensive set of professional color-correction tools.
  • Improved File Browser: quickly preview, tag, and sort images; search and edit metadata and keywords; and automatically share batches of files from the improved File Browser.
  • Comprehensive 16-bit support: perform more precise editing and retouching with expanded support for 16-bit images in core features, including layers, brushes, text, shapes, and more.
  • Healing Brush: effortlessly remove dust, scratches, blemishes, wrinkles, and other flaws with the Healing Brush.
  • Integrated digital camera raw file support: get truer, higher-quality output by working with the complete raw data files from most major digital camera models.
  • Match Color command: achieve a consistent look between package shots, fashion photos, and more by instantly matching the color scheme of one image to another.
  • Histogram palette: monitor changes to your image in the Histogram palette, which dynamically updates as you make adjustments.
  • Shadow/Highlight correction: quickly improve the contrast of over- or under-exposed areas of an image while preserving the overall balance of the photo.
  • Crop and Straighten command: Scan multiple images at once and let Photoshop automatically straighten and save each image as an individual file.
Top Features for Web Designers:
  • Enhanced ImageReady user interface: create and modify Web designs faster with multiple object selection, object grouping, and smart guides.
  • Improved Photoshop integration: enjoy quicker, more seamless integration between Photoshop and ImageReady, plus automated file saving and common commands, tools, and shortcuts.
  • Image slicing: slice complex, layered images and apply appropriate format and compression settings to each area before exporting as an HTML table.
  • Variable data support: easily import database and spreadsheet information to automate the production of Web graphics.
  • Macromedia Flash (SWF) file export: use ImageReady CS to create Macromedia Flash (SWF) animations, complete with vector artwork and variable text.
  • Animated GIF creation: turn layered Photoshop or Illustrator files into compact GIF animations in a few short steps.
  • Web Content palette: create and edit rollovers and other interactive Web elements more easily using the new Web Content palette.
  • Layers-as-files export: optimize and export individual layers as separate files for use in Macromedia Flash (SWF) animations and dynamic HTML.
  • Weighted optimization: smoothly vary compression settings using channels to display higher-quality results in critical image areas.
  • Streamlined HTML output: create leaner, more easily edited HTML with new controls for nested tables, XHTML, and more.

Photoshop CS2
Smooth File Handling with Adobe Bridge
Simplify file handling with Adobe Bridge, the next-generation file browser. Students can process multiple camera raw images at once; resize, rate, and label thumbnails; quickly review images in Slideshow mode; search metadata; and more.

Vanishing Point
This revolutionary technology lets you produce amazing results in a faction of the time. You can confidently clone, brush, and paste elements that automatically match the perspective of any image area.

Image Warp
Students can easily create packaging mock-ups or other dimensional effects by wrapping an image around any shape or stretching, curling, and bending an image using the Image Warp tool. Faculty
and students will embrace this new feature, which lets them add dimensionality to their creations without using complex 3D software.

Advanced Noise Reduction
Give your work a professional look by polishing digital photos and removing JPEG artifacts with advanced noise reduction. Now you can produce images that look great for advertisements, brochures, posters, magazines, newspapers, Web sites, presentations, and much more.

Multiple Layer Control
Select and move, group, align, transform, and warp objects more intuitively by clicking and dragging directly on the canvas. Now it's easier for students to work with complex, layered images.

Setting up Private Network (Waste)

How to setup WASTE

First download the setup file here:
WASTE setup Download

Run the setup program that you downloaded.

For the first few steps, click next until you get to the following step.


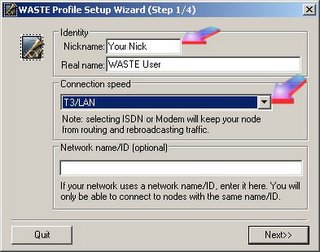
Put in a nickname or screename and put the real name just whatever you'd like.

Select T3/LAN for the connection speed.

Leave the Network name/ID blank.

Click next.

On the following step, click on "Run key generator"

You'll also make a password, which you can save later, but use a password you won't forget.


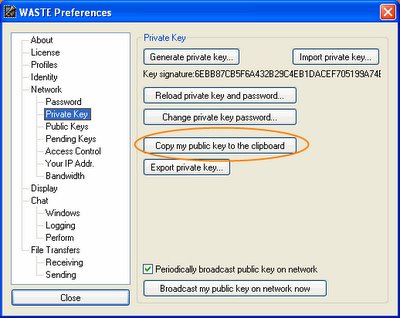
After you've generated your key click on "Copy my public key to the clipboard". Now open up notepad (Start > All Programs > Accessories) or another text editor and paste your key. Save the text file and email/IM it to the person that is connecting you to the network.

The person connecting you to WASTE needs to add your key that you just sent them. That can be done by opening the main WASTE window and going to File > Preferences > Public Keys
1) Click on the add button and import the text file containing the key.
(See image below)


Now click on "Import public keys" and import the text file that either myself or a friend has given you to connect to the network.

For the person already on WASTE to give you their key, they should:

1) Open the main WASTE Window and go to File > Preferences > Private Key
2) Click on copy my public key to the clipboard.
3) either save the key in notepad (Start > Accessories > Notepad) or they can email you the text of the key (it's better NOT to instant message the key because it can get cut off.)
(See image below)


Now the new person connecting to WASTE can either paste in the key or import the text file containing the key.

After you've received the confirmation that the key was imported, click next.

Now to choose the folder for your downloads.

I recommend using the My Music folder on your PC, unless you'd like a different folder for your music/movie/software downloads to go into.


It's up to you whether or not you share your music and other stuff, but if you've got something really rare, or an eclectic collection of music it would be sweet to share. Again, it's up to you.

Now click run.

Ok, we're almost done!!!

In the little window that comes up, click on the icon with the arrow pointing to it.


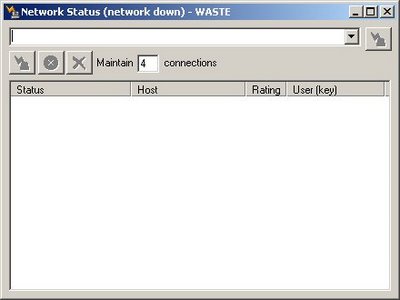
When the following window comes up, change the Maintain "0" connections box to the number 4. Then, type in the IP address of the person connecting you to the network. (If you need to know how to get the IP address read below.)

Once you have the person's IP address type, or paste it, and hit enter.


How to find the person's IP address who is already on WASTE.

1) In the little WASTE window with all of the user names, click on File > Preferences. Then click on Your IP Addr. on the left hand menu. (See the image below.)


Within a few seconds a window should pop-up asking you if you would like to accept a key from a user's name.

Click yes, and keep clicking yes (or use the y key on your keyboard) until it doesn't ask you anymore. You'll probably have to accept about 40-60 keys. Every time you click yes, this is connecting you to a new person.

After that's done, in the same window change the number of connections to 10.

You can close this window now.

Now you should be setup on the network, and there shouldn't be anymore setup required each time you want to connect.


There are two settings you should adjust before using WASTE.

Click on File > Preferences.

Click on "Receving" and make sure the box is checked to "Prompt before accepting"


Now click on "Pending Keys" and check the box for "Auto-accept broadcasted public keys"


This will prevent the key prompts from coming up while you are doing other work. On several occassions, I was playing a multiplayer first person shooter and the key box pop-up in front of my screen, pausing the game. It will also prevent you from being annoyed by having to accept new ones while you're working on other stuff.

NOW YOU'RE READY TO EXPERIENCE THE GLORY OF WASTE.

To search for files, click on the magnifying glass icon in the main window.


Safari sam slot betsoft