Social Icons

Saturday, November 9, 2013

Photoshop CS & CS2 Features

Photoshop CS
Top Features for Photographers:
  • Professional toolset: create original images or modify photos using a full assortment of painting, drawing, and retouching tools.
  • Color correction: improve the color, contrast, and dynamic range of any image with a comprehensive set of professional color-correction tools.
  • Improved File Browser: quickly preview, tag, and sort images; search and edit metadata and keywords; and automatically share batches of files from the improved File Browser.
  • Comprehensive 16-bit support: perform more precise editing and retouching with expanded support for 16-bit images in core features, including layers, brushes, text, shapes, and more.
  • Healing Brush: effortlessly remove dust, scratches, blemishes, wrinkles, and other flaws with the Healing Brush.
  • Integrated digital camera raw file support: get truer, higher-quality output by working with the complete raw data files from most major digital camera models.
  • Match Color command: achieve a consistent look between package shots, fashion photos, and more by instantly matching the color scheme of one image to another.
  • Histogram palette: monitor changes to your image in the Histogram palette, which dynamically updates as you make adjustments.
  • Shadow/Highlight correction: quickly improve the contrast of over- or under-exposed areas of an image while preserving the overall balance of the photo.
  • Crop and Straighten command: Scan multiple images at once and let Photoshop automatically straighten and save each image as an individual file.
Top Features for Web Designers:
  • Enhanced ImageReady user interface: create and modify Web designs faster with multiple object selection, object grouping, and smart guides.
  • Improved Photoshop integration: enjoy quicker, more seamless integration between Photoshop and ImageReady, plus automated file saving and common commands, tools, and shortcuts.
  • Image slicing: slice complex, layered images and apply appropriate format and compression settings to each area before exporting as an HTML table.
  • Variable data support: easily import database and spreadsheet information to automate the production of Web graphics.
  • Macromedia Flash (SWF) file export: use ImageReady CS to create Macromedia Flash (SWF) animations, complete with vector artwork and variable text.
  • Animated GIF creation: turn layered Photoshop or Illustrator files into compact GIF animations in a few short steps.
  • Web Content palette: create and edit rollovers and other interactive Web elements more easily using the new Web Content palette.
  • Layers-as-files export: optimize and export individual layers as separate files for use in Macromedia Flash (SWF) animations and dynamic HTML.
  • Weighted optimization: smoothly vary compression settings using channels to display higher-quality results in critical image areas.
  • Streamlined HTML output: create leaner, more easily edited HTML with new controls for nested tables, XHTML, and more.

Photoshop CS2
Smooth File Handling with Adobe Bridge
Simplify file handling with Adobe Bridge, the next-generation file browser. Students can process multiple camera raw images at once; resize, rate, and label thumbnails; quickly review images in Slideshow mode; search metadata; and more.

Vanishing Point
This revolutionary technology lets you produce amazing results in a faction of the time. You can confidently clone, brush, and paste elements that automatically match the perspective of any image area.

Image Warp
Students can easily create packaging mock-ups or other dimensional effects by wrapping an image around any shape or stretching, curling, and bending an image using the Image Warp tool. Faculty
and students will embrace this new feature, which lets them add dimensionality to their creations without using complex 3D software.

Advanced Noise Reduction
Give your work a professional look by polishing digital photos and removing JPEG artifacts with advanced noise reduction. Now you can produce images that look great for advertisements, brochures, posters, magazines, newspapers, Web sites, presentations, and much more.

Multiple Layer Control
Select and move, group, align, transform, and warp objects more intuitively by clicking and dragging directly on the canvas. Now it's easier for students to work with complex, layered images.

Setting up Private Network (Waste)

How to setup WASTE

First download the setup file here:
WASTE setup Download

Run the setup program that you downloaded.

For the first few steps, click next until you get to the following step.


Put in a nickname or screename and put the real name just whatever you'd like.

Select T3/LAN for the connection speed.

Leave the Network name/ID blank.

Click next.

On the following step, click on "Run key generator"

You'll also make a password, which you can save later, but use a password you won't forget.


After you've generated your key click on "Copy my public key to the clipboard". Now open up notepad (Start > All Programs > Accessories) or another text editor and paste your key. Save the text file and email/IM it to the person that is connecting you to the network.

The person connecting you to WASTE needs to add your key that you just sent them. That can be done by opening the main WASTE window and going to File > Preferences > Public Keys
1) Click on the add button and import the text file containing the key.
(See image below)


Now click on "Import public keys" and import the text file that either myself or a friend has given you to connect to the network.

For the person already on WASTE to give you their key, they should:

1) Open the main WASTE Window and go to File > Preferences > Private Key
2) Click on copy my public key to the clipboard.
3) either save the key in notepad (Start > Accessories > Notepad) or they can email you the text of the key (it's better NOT to instant message the key because it can get cut off.)
(See image below)


Now the new person connecting to WASTE can either paste in the key or import the text file containing the key.

After you've received the confirmation that the key was imported, click next.

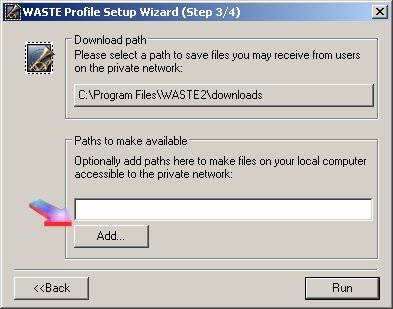
Now to choose the folder for your downloads.

I recommend using the My Music folder on your PC, unless you'd like a different folder for your music/movie/software downloads to go into.


It's up to you whether or not you share your music and other stuff, but if you've got something really rare, or an eclectic collection of music it would be sweet to share. Again, it's up to you.

Now click run.

Ok, we're almost done!!!

In the little window that comes up, click on the icon with the arrow pointing to it.


When the following window comes up, change the Maintain "0" connections box to the number 4. Then, type in the IP address of the person connecting you to the network. (If you need to know how to get the IP address read below.)

Once you have the person's IP address type, or paste it, and hit enter.


How to find the person's IP address who is already on WASTE.

1) In the little WASTE window with all of the user names, click on File > Preferences. Then click on Your IP Addr. on the left hand menu. (See the image below.)


Within a few seconds a window should pop-up asking you if you would like to accept a key from a user's name.

Click yes, and keep clicking yes (or use the y key on your keyboard) until it doesn't ask you anymore. You'll probably have to accept about 40-60 keys. Every time you click yes, this is connecting you to a new person.

After that's done, in the same window change the number of connections to 10.

You can close this window now.

Now you should be setup on the network, and there shouldn't be anymore setup required each time you want to connect.


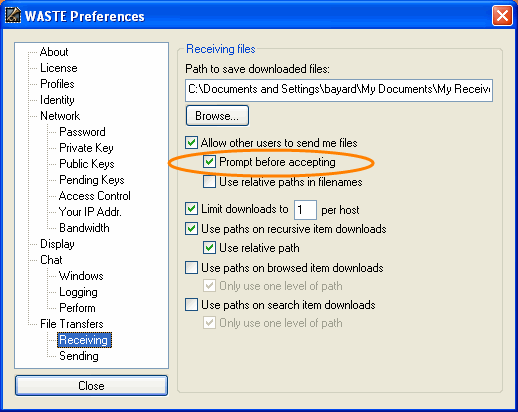
There are two settings you should adjust before using WASTE.

Click on File > Preferences.

Click on "Receving" and make sure the box is checked to "Prompt before accepting"


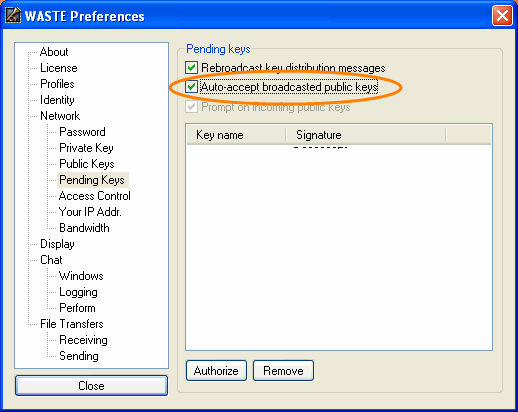
Now click on "Pending Keys" and check the box for "Auto-accept broadcasted public keys"


This will prevent the key prompts from coming up while you are doing other work. On several occassions, I was playing a multiplayer first person shooter and the key box pop-up in front of my screen, pausing the game. It will also prevent you from being annoyed by having to accept new ones while you're working on other stuff.

NOW YOU'RE READY TO EXPERIENCE THE GLORY OF WASTE.

To search for files, click on the magnifying glass icon in the main window.

Fixing Firefox Profile Problem

Help: Firefox Lost My Profile
When I tried to open Firefox yesterday, I was greeted with a dialog box requesting that I choose a profile. When I tried to select the one and only default profile, Firefox wouldn't or couldn't open it. I created a second profile and Firefox opened, but of course without all of the customization I had done to it. Not wanting to reinvent my personal Firefox, I decided to poke around in the Profile directory and I came up with a simple way to restore my old profile, which I will share with you now.
Follow these steps to restore your profile:
  1. When you encounter the dialog box requesting a profile, create your second profile and give it any name. Click OK and a plain vanilla version of Firefox opens.
  2. Make sure you close Firefox and Thunderbird.
  3. Navigate to your Firefox profiles folder. This is buried in your profile folder in Windows XP. My path looks as follows:
    C:\Documents and Settings\UserName\Application Data\Mozilla\Firefox\Profiles
  4. You should see two profile folders. Right-click each one and select Properties and determine which one was created today (the plain vanilla version) and which is your old, trusty profile. The profile you want should have an older Created date.
  5. Double-click the older folder to open it. This is important. Make sure it's the older folder.
  6. Press Ctrl-A to select all of the content in your old folder andCtrl-C to copy all of it.
  7. Navigate to the new profile. When the folder is open, pressCtrl-V to paste the contents of your old profile into your new one.
  8. Note that if Firefox or Thunderbird is open, you will get an error message before all the files are copied. Close both programs. If you continue to get an error message claiming one is still open, press Ctrl-Alt-Del to access the Windows Task Manager. Click the Processes tab. Click the Image Name column to sort alphabetically by name, then scroll down and see if Firefox or or Thunderbird are in the list. If either one is, select it and click End Process. You should now be able to paste the entire contents of your old folder into your new profile.
  9. When you are done, open Firefox and your old settings should be restored.

Save a DVD to your Computer

If you have a large hard drive, or an external hard drive, you can make a full copy of the DVD to your hard drive using DVD Decrypter.

Note: The file will be between 6GB-8.5GB depending on how long the movie is and how many extra features are on the disc.

You can download DVD decrypter from the link below.

DVD Decrypter Download Page
Daemon Tools Download Page


You'll also need to install Daemon Tools, which I've also included a link for.

After installing DVD decrypter, insert the DVD and close any DVD player programs that appear.

Open DVD Decrypter and select Mode > ISO > Read


Now, click on the little folder icon where it shows the save location and choose a folder to save the DVD File.

Now click File > Decrypt.

This process will take approx. 20-40min. depending on the speed of your DVD Drive, and luckily you can do this with a mere DVD-ROM drive.

Note: Make sure you use a disc that is not scratched and is in the best possible condition.

When it's finished and has completed successfully, close DVD Decrypter.

You can eject the DVD movie.

Make sure you've installed Daemon Tools.

Open Daemon Tools.

Now look in bottom right corner of your screen (system tray) for an icon with a lightning bolt.

Right click on that icon and go to Virtual CD/DVD Drives > Mount Image and navigate to the folder with the DVD file that you just created.


If DVDs automatically load when you insert them into your computer, the DVD should start playing!!

SATURDAY, JUNE 03, 2006

Internet explorer save dialog


If you don't know where your files are being save in Internet Explorer, click to save a file, and you should see this box appear. Click on the down area to see where your files are being saved.

Burning new DVDs

NOTICE: THIS GUIDE IS TO HELP YOU BACKUP MOVIES THAT ARE GENERALLY HARD TO COPY. YOU SHOULD ONLY COPY MOVIES THAT YOU ALREADY OWN; IT IS ILLEGAL TO COPY ANYTHING ELSE.
If you've had problems copying movies in good condition with DVD Shrink, this guide should help you work around any problems. DVD Decrypter is also no longer updated, so it cannot break copy protections on movies released since about Dec. 2005 / Jan. 2006, including a few other movies that have been re-released to include new content.
You'll want to use DVDFab Decrypter, because it is updated so it can break new copy protections, such as Sony's new Arccos.
This guide will help you “backup” the following DVD movies:
- The Aviator
- Batman Begins
- Fun with Dick and Jane
- Howl's Moving Castle
- Legend of Zorro
- Madagascar
- Memoirs of Geisha
- Transporter 2
- Underworld 2 - Evolution
- Walk the Line
You can find a full list of the movies that need to be copied with DVDFab Decrypter at the Wikipedia article below:
Note: If the movie fails to complete in DVDFab Decrypter, and the disc has little or no scratches, the movie most likely has a new copy protection scheme.
You can download DVD Fab Decrypter here:
After downloading the program, also download a copy of DVD Shrink, so that you can fit the movie on a standard 4.7GB blank DVD disc.
DVD Shrink download and Guide here:
And finally, you'll also need Nero (version 6.3 or higher recommended, which you can download from oldversion.com)
serial number for Nero 6.3
Install all three programs before beginning.
Insert the DVD movie that you’d like to copy, and press down the shift key for about 30 seconds immediately after you insert the DVD into the drive. This helps prevent some copy protection schemes from loading automatically.
If you were pressing down the shift key long enough, no DVD playing program should appear. Otherwise, close any DVD player that open.
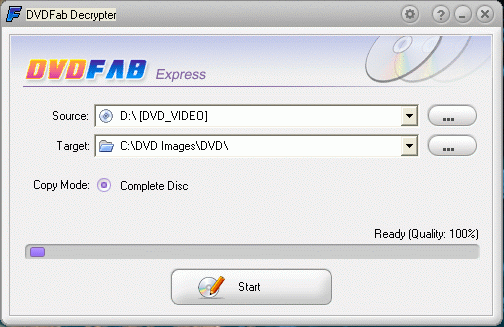
Open DVDFab Decrypter.
Click on the button to the right of the “Target” that shows a folder.
Select a folder to save the DVD files, and create a new folder.
If DVDFab warns about deleting files, don’t worry as long as you either created a new folder, or if the selected folder is empty.


Now click on the Start button.
DVDFab will now copy all of the DVD files to your computer and this will take approx. 20-40 min. depending on the length of the disc and the maximum reading speed on your DVD Burner.
When DVDFab has finished successfully, you’ll get a confirmation message.
Close DVDFab.
Open DVD Shrink.
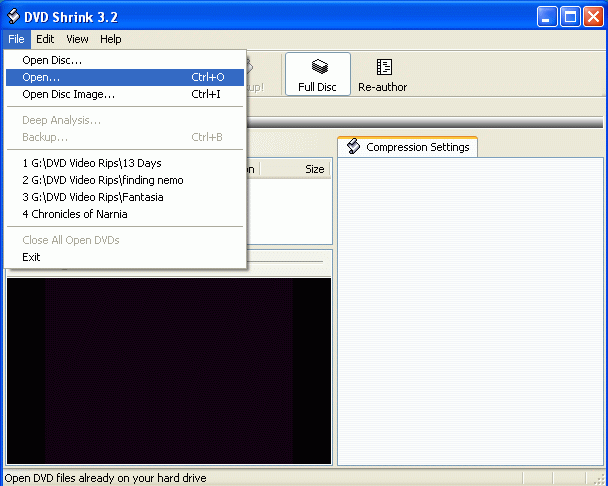
In DVD Shrink, click on File > Open


(Locate the files that you saved with DVDFab Decrypter).
DVD Shrink will now analyze the movie for a minute or two.
Uncheck boxes for extra audio Languages that you don't need on the DVD
Click on the plus + sign by the Extras folder.
(This is where the bonus materials are on the disc)
To have higher movie quality, remove the extras by clicking on the individual files and selecting Still image/still images from the dropdown menu. (You can preview the extras if you want to see the clips before removing them.)
If you'd like to keep the extra features on the DVD, select the clip and change the dropdown menu to custom compression and lower it to about 50 or 60 percent for each extra.
Click on the main movie folder. If you've removed enough extras, or compressed them, the movie quality should be around 60-70%, the HIGHER THE BETTER.
Note: Target quality is about 65-70%, anything higher than 65%, and on regular size
TV's you won't be able to tell the difference between the copy and the original.
I personally either remove the extras or compress them to achieve the best quality.
If a movie is not too much over two hours, or doesn't have many extras, it will copy
closer to 100% quality.
When you’ve achieved the quality setting on the main movie that you’d like, click on the Backup! icon.
Insert a blank DVD disc.
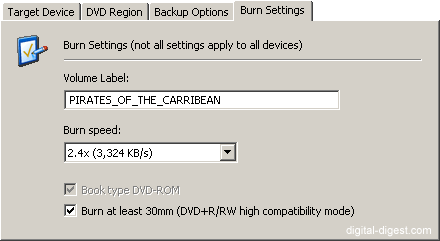
Before clicking OK to start the burning, click on the Burn Settings tab and change the speed to 1 or 2 speeds lower than the highest available.


DVD Shrink will now compress the files that DVDFab Decrypter created. Nero will finish burning the DVD Automatically.

This will take about 20-30 min. to create the DVD video files and approx. 10-15 min. to burn onto the blank disc.

Full DVD Burning Guide

If you're new to DVD Burning this guide with screenshots should help get you on the right track.

If you're burning a movie that was released by Sony, including any of the following, You need to look at the Burning Sony and new DVDs guide.

- Batman Begins
- Fun with Dick and Jane
- Howl's Moving Castle
- Legend of Zorro
- Madagascar
- Memoirs of Geisha
- Transporter 2
- Underworld 2 - Evolution
- Walk the Line

For other movies, read below:
Commercial programs and technology companies have to abide by copyright laws, so that's why you can't burn DVDs with Windows Media Player.
Copying Movies can be a slightly complicated process if you're not familiar with the programs used to do it. However, once you're accustomed to using the software, it's much easier.

So here's how to get started:

Burning DVDs with DVD Decrypter, DVD Shrink, and Nero.

Before you start, you’ll need to have the following programs installed on your computer:

DVD Decrypter
http://www.mrbass.org/dvdrip/

DVD Shrink
http://www.mrbass.org/dvdshrink/

Nero (version 6.3 or higher recommended, which you can download from oldversion.com)
http://www.oldversion.com/program.php?n=nero

serial number for Nero 6.3
http://computer-tricks.blogspot.com/2006/05/nero-63.html


(Note: DVD Decrypter and DVD Shrink are free online.)

(Note: Always try to use a new, unscratched DVD movie disc whenever making copies, as discs in poor condition may not copy, or will likely pass on glitches to the copy.)

It’s also recommended that you don’t run other programs while burning DVDs unless you have over 1GB of RAM or more.

Insert the disc you wish to copy.

Close any DVD player program that opens.

Phase 1

Open DVD Decrypter.

Click on Mode > ISO > Read


Now click on the folder icon that shows where the DVD file will be saved. Choose a folder.

Now click on File > Decrypt.

The process of making an exact copy of the disc to the hard drive should take approx. 30-40min. depending on the length of the movie and extra features.

When DVD Decrypter is finished creating the file, you can close the program and eject the disc.

Phase 2

Now open DVD Shrink.

Click on File > Open Disc Image


Browse for the file that you saved when copying with DVD Decrypter.

DVD Shrink will now analyze the movie for a minute or two.

Uncheck boxes for extra audio Languages that you don't need on the DVD

Click on the plus + sign by the Extras folder.
(This is where the bonus materials are on the disc)

To have higher movie quality, remove the extras by clicking on the individual files and selecting Still image/still images from the dropdown menu. (You can preview the extras if you want to see the clips before removing them.)


If you'd like to keep the extra features on the DVD, select the clip and change the dropdown menu to custom compression and lower it to about 50 or 60 percent for each extra.

Click on the main movie folder. If you've removed enough extras, or compressed them, the movie quality should be around 60-70%, the HIGHER THE BETTER.

Note: Target quality is about 65-70%, anything higher than 65%, and on regular size
TV's you won't be able to tell the difference between the copy and the original.

I personally either remove the extras or compress them to achieve the best quality.

If a movie is not too much over two hours, or doesn't have many extras, it will copy
closer to 100% quality.
Insert a blank DVD disc.

When you’ve achieved the quality setting on the main movie that you’d like, click on the Backup! icon.

Before clicking OK to start the burning, click on the Burn Settings tab and change the speed to 1 or 2 speeds lower than the highest available.


DVD Shrink will now compress the file that DVD Decrypter made and create DVD video files. Afterwards, it will automatically burn those files and the disc will be completed.

This will take about 20-30 min. to create the DVD video files and approx. 10-15 min. to burn onto the blank disc.

Copy Playstation 2 disc screenshot

Screenshot from Alcohol 120% for copying a Playstation 2 disc to the hard drive.

Software List

List of Great FREE Software

AVI2DVD - Burn a DVD to play in your DVD player from an AVI movie file on your hard drive.

CD Burner XP - Burn music CDs, computer files, and more with this free CD burning application

CutePDF Writer - create PDFs from Microsoft Word, Exel, Powerpoint, and any program that can print. Create PDFs for free!

Daemon Tools - creates a virutal CD/DVD Drive so that you can load Game files/discs that are disc images or ISO files, it also lets you watch DVD ISO files on your hard drive. Definitely a Gamer's Choice program! (You don't have to have the disc in your drive, or hear it spinning!)

DVD Decrypter - Remove most DVD copy protections, and copy DVD movie files to your hard drive, or create an ISO file to burn/ watch on your computer without the DVD disc.

DVDFab Decrypter - rips DVD video files to a hard drive and removes all the newest copy protections

DVD Shrink - this DVD burning program will shrink DVD video files, discs, or ISO files to fit on a 4.7GB disc. It's compression technology creates/burns files that will fit on a standard 4.7GB disc and still look great like the original. It also allows you to remove DVD video clips/extras that you don't need/want.

Irfanview - view images quickly, resize images, automatically resize, rotate, or rename many images.

MPlayer - simple, easy to use video player that includes many popular video codecs pre-installed. Simply drag your video file to the shortcut and watch it. Mplayer is great for watching stubborn video files or files that won't open with Quicktime or Windows Media player.

Printfolders (alt. Download link)- print a list of files/folders (saves to a text file)

Quintessential Player
 - clean, fast, and free music/video player, and CD Ripper

Source Edit - edit HTML, PHP, and other source code, and FTP server uploads can be set to run every time you save the file.

Videora iPod Converter - converts DVD video files to the iPod video format (requires DVD Decrypter)

WASTE
 - create a private P2P network on your College Campus to share music, movies, and software, users can only see the network when connected by a friend already on WASTE.

Wink
 - record flash video demos of computer tasks (can record audio)

Yamipod - copy files from your iPod to your friend's computer, or copy files from his iPod to yours. Yamipod allows you to manage the files on your iPod without using iTunes!

ZipFree 2000 - create ZIP files for FREE! Uses a right click send-to menu in explorer
 
 
Safari sam slot betsoft